Do Talks Body in Tableau Again
This section describes the basic elements of views that you tin create in Tableau. You can show or hibernate parts of the view equally needed (described beneath). Every view has a table in some form, which may include rows, columns, headers, axes, panes, cells, and marks. Views can optionally include tooltips, titles, captions, field labels, and legends.
The View area
Data views are displayed in a table on every worksheet. A table is a collection of rows and columns, and consists of the following components: Headers, Axes, Panes, Cells, and Marks. In improver to these, y'all can choose to testify or hide Titles, Captions, Field Labels, and Legends.

Also see information on Cells and Panes.
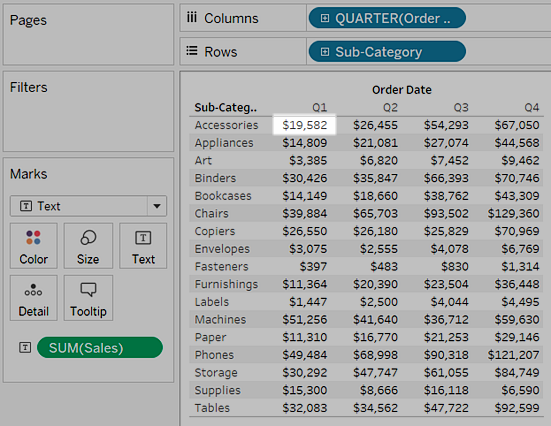
Headers are created when y'all place a dimension or detached field on the Rows shelf or the Columns shelves. The headers show the fellow member names of each field on the shelves. For instance, in the view beneath the column headers show the members of the Order Engagement field and the row headers prove the members of the Sub-Category field.

You lot can show and hibernate row and column headers at anytime.
To hibernate headers:
-
Right-click (command-click on Mac) the headers in the view and select Evidence Header.

To show headers:
-
Select the field in the view whose headers you desire to prove and select Evidence Header on the field card.

Hiding headers can exist useful when y'all are working with multiple measures. For example, the view below shows both the sales and profit for each region along a single centrality. You can see the view looks cluttered with the Measure Names headers showing. Because Mensurate Names is likewise indicated by the mark colour, you lot can hide the excess headers to make clean up the view.

Axes
Axes are created when you place a mensurate or continuous field on the Rows or Columns shelves. By default, the values of the mensurate field are displayed along a continuous axis.

You tin can evidence and hide axes at any time.
To hide axes:
-
Right-click (control-click on Mac) the axis in the view and select Show Header to clear the check marking next to this option.

To show axes:
-
Right-click (control-click on Mac) the measure out in the view whose axis yous want to prove and select Testify Header on the field menu.

Panes
A pane is defined by the intersection of fields on the rows and columns shelves.
In a table calculation, this is seen as 1 or more cells that belong to the same field, which are computed down or across co-ordinate to the calculation, as in the example below:

For more than information, see Transform Values with Table Calculations.
Cells
Cells are the basic components of whatever table you lot can create in Tableau, divers by the intersection of a row and a column. For example, in a text tabular array, a cell is where the text is displayed, as shown in the view below:
Marks
When you drag fields to the view, the information are displayed using marks. Each mark represents the intersection of all of the dimensions in the view.
For case, in a view with Region and Twelvemonth dimensions, at that place is a mark for every combination of those two dimensions (East 2011, Due east 2012, West 2011, Due west 2012, etc.). In this case, the mark type is set to Text, so the Abc represents the location where the value for the text mark will appear—once a measure out such as Sales is added to the view.

For details on creating and customizing marks, meet Marks card, Command the Advent of Marks in the View, Change the Blazon of Mark in the View, Stack Marks
Marks can be displayed in many different ways including lines, shapes, bars, maps, and then on. You tin can show additional information virtually the data using marking properties such every bit color, size, shape, labels, etc. The type of marker you apply and the mark properties are controlled by the Marks carte du jour. Drag fields to the Marks menu to show more data. For instance, the same view above is shown once more beneath but this time with Profit on Color. With this boosted data, it is clear that the W region had the highest profit in 2014.

Control the marks in the view using the Marks card. Use the drib-down carte du jour to specify the type of mark to show. Elevate fields to the Marks bill of fare and utilize the drop-down controls to add more data to the view and control the colour, shape, size, labels, and number of marks in the view.
Tooltips are boosted data details that display when you hover over i or more marks in the view. When you select ane or more marks and hover, tooltips also include options to filter marks (exclude or keep just), display marks that have the same values, create groups, create sets, or display the underlying information. If yous don't want users to exist able to access tooltip commands, you lot can disable them.

For details on formatting tooltips and other tooltip settings, also see Format Titles, Captions, Tooltips, and Legends, Add tooltips to marks, and Create Views in Tooltips (Viz in Tooltip). For details on analysis options in tooltips, see Explore and Inspect Information in a View
Tooltip command buttons for exploring data in a viz
The peak of the tooltip lists commands for filtering information, creating a grouping, sorting the selection, and view the underlying data. For instance, you can employ the tooltip to quickly remove an outlier in a besprinkle plot. Each of the commands are described beneath.
To run across tooltip commands, hover over a mark and so keep the cursor still. The
- Keep Just - creates a filter that removes all other data. Meet Select to go along or exclude data points in your view(Link opens in a new window) to learn more.
-
Exclude - creates a filter that removes the selected data. See Select to keep or exclude data points in your view(Link opens in a new window) to learn more.
-
Group Members - creates a grouping based on the selection. If the option contains multiple dimensions, you can grouping on one dimension or all dimensions. Come across Right Data Errors or Combine Dimension Members by Grouping Your Data to learn more.
-
Create Gear up (Tableau Desktop merely) - creates a new set containing the selected members. You lot tin create a new fix or add together members to an existing gear up. Come across Create Sets to learn more.
-
View Data - opens a window displaying the data. You tin can view the summarized data or the underlying data. See View Underlying Data to learn more.
These commands are visible by default. You can disable the commands in the Edit Tooltip dialog box by deselecting Include command buttons. Doing so volition besides hide the aggregation summary if multiple marks are selected.
Disable tooltip commands
If you lot don't want users to be able to access tooltip commands, you can disable them.
-
Click Tooltip on the Marks carte or select .
-
In the Edit Tooltip dialog box, clear the Include command buttons check box.
Tooltip settings apply to the agile worksheet and can be different for each sheet in the workbook.
Body text and markup in tooltips
The trunk of a tooltip contains details well-nigh a specific marking or a pick of multiple marks. For case, in a bar chart showing sales past region, the tooltip trunk may include the actual sales amount and the region proper name. The default tooltip is based on the fields used in the view. You tin can customize what is shown in the tooltip past dragging fields to Tooltip on the Marks carte du jour.
To customize a tooltip and its formatting, click Tooltip on the Marks card.
Alternatively, you can select .
Action links
If the sheet has any actions, the action links are listed below the body of the tooltip. An action adds context and interactivity to your data through filters, highlighting, and links to external resources. See Actions to learn more about adding actions to your workbook.
Titles
You tin show titles on any worksheet, dashboard, or story. For worksheets and stories, a championship is displayed past default, only you tin remove information technology. For dashboards, you can add a title. By default, the championship is the name of the sheet, just y'all can edit the championship to change the text and include dynamic values such as page number and sheet proper name. For more information about how to format titles, see Format Titles, Captions, Tooltips, and Legends.
Prove and hide titles in worksheets
Titles are shown past default for worksheets and are included equally part of the worksheet, shown at the height of the view. You tin can motion the championship to the sides or the bottom of the view. Withal, when yous move the championship from the top of the view, information technology becomes a Championship card and displays like any other card in the view.
Notation: If yous movement a title from the top position and then hide it; when you show the championship again, it appears back at the superlative of the worksheet in its default position.

To show or hide titles in a worksheet
-
From the toolbar carte du jour, click Worksheet > Show Title.
-
On the toolbar, click the drop-down arrow on the Bear witness/Hibernate Cards button and select Championship from the context card.
Toggle the check mark on or off to show or hide the title.
Show and hide titles in dashboards
You can turn on titles for dashboards. The title appears as office of the dashboard.
To show or hide titles on a dashboard, from the toolbar menu, select Dashboard >Bear witness Championship.

When you add worksheets to the dashboard, the championship of the worksheet automatically shows, even if you turned off the title on the worksheet itself. To turn off the championship for the worksheet on the dashboard, do the following steps:
- In the dashboard, select the worksheet to highlight it.
- In the top correct corner of the highlighted worksheet, click the drop-downwards arrow and select Championship in the context card to clear the check marker.
Show and hide titles in stories
Story titles are displayed past default. To toggle story titles on or off, in the top menu, select Story >Prove Title to add together or remove the cheque marker.
Captions
All views tin can have a caption that is either automatically generated or manually created. The caption is displayed on the Caption card.
To show a caption in a worksheet, select it on the Show/Hibernate Cards toolbar menu  or select Worksheet > Bear witness Explanation.

The caption is automatically generated past default.
To edit the explanation, double-click the Caption area in the view. In the Edit Explanation dialog box, you tin employ modify the font, size, colour, and alignment and fashion.
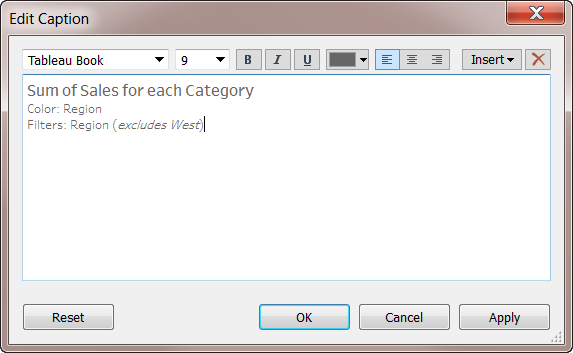
Click the Insert bill of fare to add automatic text such as page number, sheet name, and field and parameter values.
The caption tin optionally be included when press, printing to PDF, and publishing to Tableau Server. When you consign the view as an image to another application similar Microsoft PowerPoint, you can optionally include the caption.
Field Labels
Placing discrete fields on the rows and cavalcade shelves creates headers in the view that display the members of the field. For instance, if you place a field containing products on the rows shelf, each product name is shown as row headers.
In add-on to showing these headers, y'all can evidence field labels, which are labels for the headers. In this example, the rows are labeled Category, to indicate that the discrete category names are members of the Category field.

Field labels utilise only to detached fields. When you add together continuous fields to the view, Tableau creates an centrality. The centrality is labeled with a header.
By default, field labels are shown.
To hide or prove field labels, select Assay > Table Layout > Evidence Field Labels for Rows or Show Field Labels for Columns.

Yous can format the fonts, alignment, shading, and separators for field labels.
When you add fields to Color, Size, and Shape on the Marks card, a legend displays to betoken how the view is encoded with relation to your data.
Color Fable

Size Fable

Shape Legend

Not simply practise legends help you understand encodings, yous can also use legends to sort, filter, and highlight specific sets of data. For more than information, see Legend Highlighting(Link opens in a new window).
Measure values and colour legends
If you include the Measure out Values and Mensurate names fields in your views, you can create either a single combined color legend or carve up color legends for your measures. If you drag the Measure Values field to Colour on the Marks bill of fare, by default Tableau creates a single color fable that applies 1 color palette to all marks in the view. If you want to differentiate sure measures in the view you lot can create separate color legends for the measures and assign a unique color palette to each fable.
For more than data near Measure out Values and Measure Names, run across Measure Values and Measure Names.
The following example shows how to create carve up colour legends. This example uses the Sample Superstore data set.
-
Connect to the Sample-Superstore data set.
-
From the Data pane:
-
Drag Order Date to the Columns shelf and Category and Sub-Category to the Rows shelf.
-
Drag Measure Names to the columns shelf and driblet information technology to the correct of Order Date.
-
Drag Mensurate Values to Color on the Marks card.
-
-
In the Measure out Values menu, drag measures off the menu and then that you continue SUM(Sales), and SUM(Profit) merely.
-
Click Label on the Marks carte and select Testify mark labels to testify the mensurate values in the view.
When y'all elevate Measure Values to Color on the Marks carte du jour, Tableau creates a unmarried color legend and adds it to the view. Your view should wait something like this.

-
To create split legends for each measure on the view, click the drop-down arrow on the Measure Values field in the Marks card and select Apply Divide Legends from the context menu.
Tableau Desktop version Web version 

Tableau creates an individual colour legend for each measure in the view using the default color palette.

To assign a different colour palette to the color legend, do one of the following:
-
In Tableau Desktop, click the drop-down arrow in the top right corner for each color legend and select Edit Colors. Then select a color from the Palette drib-down list.
-
In Tableau Server or Tableau Online, click the drop-down pointer in the top right corner for each color legend. And then select a colour from the Palette drop-downwards list.
Your view might look something similar the post-obit example:

-
-
To combine the separate legends back to a single legend, click the drop-downward arrow on the Measure out Values field on the Marks card and select Combine Legends from the context menu.
Tableau Desktop version Web version 

barrewasheigandis.blogspot.com
Source: https://help.tableau.com/current/pro/desktop/en-us/view_parts.htm
0 Response to "Do Talks Body in Tableau Again"
Postar um comentário